A Window-Sill Colour Study for a Grey Afternoon
A window-sill colour study helps you track grey daylight across paper, paint and fabric, with clear prompts for making useful colour notes as the light shifts.
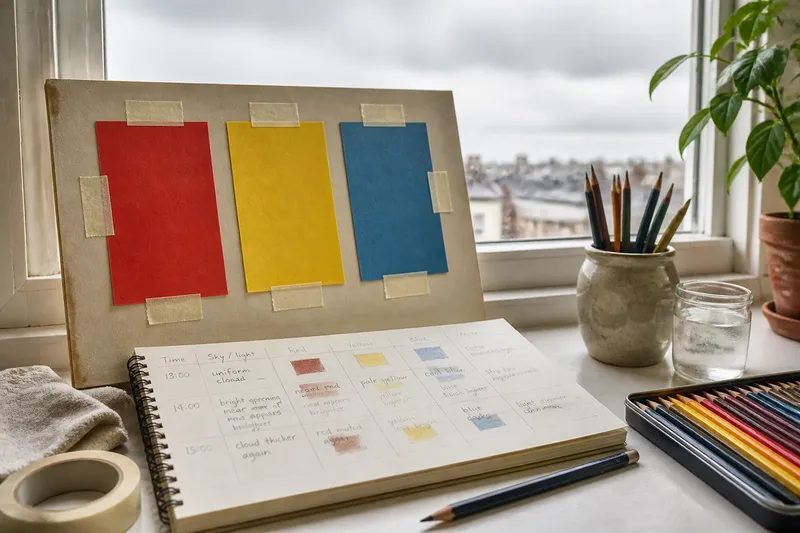
Your window-sill colour study can begin with three coloured papers taped to a board: one red, one yellow and one blue. On a grey afternoon, note how each looks near the window, then return to the same patches as the daylight shifts. This keeps the focus on colour in the room, not on arranging objects for a still life.
Use a sheet of paper divided into rows, a soft pencil and, if you like, coloured pencils or watercolour. Record what you see in plain language; the point is to make a readable trail of impressions, not to produce a polished painting or an exact colour chart.
How do you set up a window-sill colour study?
Choose flat samples with visibly different hues and keep their edges apart. Coloured paper, paint swatches or fabric scraps work well; avoid glossy surfaces, which can catch a bright reflection and distract from the colour beneath it.
Fix the samples to a board or sheet with masking tape so they cannot slide. Place the board near a window where you can see it without blocking the light, and sit or stand in one position. If the sill is too narrow, use a stable table beside the window instead.
Switch off a nearby lamp if there is enough daylight to see comfortably. Mixing warm lamplight with daylight can complicate what you observe. Keep the paper and drawing materials close by so you do not need to move the samples between notes.
What should you record when the colour looks muted?
Grey skies soften contrasts, so broad descriptions such as “dull” may not capture the differences between samples. Compare one patch directly with another: is the red warmer than the blue, or does the yellow appear lighter than the red?
Use a compact phrase that identifies both a colour family and a quality, such as “muted red”, “cool blue-grey” or “pale yellow”. If you make a swatch, use the same pencil or paint throughout the session. Let watercolour dry before comparing it with a later mark, since a wet wash can look different from the dry patch.
Keep separate notes for hue, lightness and strength when a single adjective feels vague. “Blue, darker than the yellow, low in intensity” is more useful than “odd blue”. These are working descriptions, not claims about a sample’s fixed or correct colour.
Why does a colour seem to change suddenly?
Your attention may have moved, or the sky may have shifted from evenly grey to brighter in one area. Return to the same marked patch and compare it with the same neighbour before deciding that the light changed. Note a change in the sky beside your colour description.
Choose three observation points, such as the centre of each paper sample, and revisit them in the same order. Leave a pause between rounds by putting down your pencil or looking away briefly. If no difference is clear, write “little change” rather than forcing a new description.
- If a patch looks different from your earlier note, compare the same marked area; if it still differs, add a new note, but if not, record that your viewing point may have shifted.
- If the sky brightens or darkens, write down that visible change beside the colour notes; if the sky looks steady, leave the weather entry unchanged rather than guessing.
- If a sample has a bright reflection, shift the board slightly while keeping it secure; if the glare remains, replace that sample with matte paper.
- If your description says only “grey”, compare the patch with its neighbour and add a colour direction; if no direction stands out, keep “grey” and mark the comparison as uncertain.
- If a watercolour patch is still wet, wait until it dries before comparing; if you are using dry media, continue with the same pencil or pastel for consistency.
- If your eyes feel tired, stop and rest; if they feel comfortable later and the samples remain in place, resume at the next observation point rather than rewriting the earlier notes.
- If you cannot remember which area a note refers to, draw a small map of the board; if the location is already clear, leave the page uncluttered.
How can you tell a light change from a change in attention?
Keep the sample, viewing position and comparison order steady. A note about the sky, such as “uniform cloud” or “bright opening near the edge of the window”, gives context. If you have leaned closer or moved sideways, return to your original position before comparing again.
Say you tape red, yellow and blue paper to a board and, at the first observation, describe the red as muted and the blue as cool. Later, the red seems brighter, but you also notice a pale patch of sky through the clouds. You return to your original seat, compare the same marked centre of each sample and add “red appears brighter; sky has opened” to the next row. The resulting page records both the visible colour impression and the possible light change without claiming that one caused the other.
How should you organise notes and swatches?
Divide a page into a few rows, one for each return to the samples. In each row, write a brief sky description, then note the three patches in the same order. A small arrow or a dry-media swatch can show a change that is hard to put into words.
Keep an earlier note visible if you revise it. Add the new wording alongside, then mark the patch or area it describes. This preserves the sequence and makes it easier to tell whether a change in language came from a new impression or a clearer description.
What questions come up during a window-sill colour study?
Do I need paint to record colour?
No. A pencil and descriptive words are enough, while coloured pencils or watercolour can add swatches. Use the same materials for each round so your marks are easier to compare.
What if the light barely changes?
Record the steady appearance and any differences between the samples. If nothing visibly shifts, note “little change” and leave the page as a record of that quiet interval.
Should I erase a note that seems wrong later?
Keep it and add a second note beside it. The contrast can help you distinguish a changed impression from a more precise choice of words.
Can I use fabric instead of coloured paper?
Yes, choose matte scraps and tape them flat so they stay in place. If folds create strong shadows, flatten the fabric or note which area you are comparing each time.
What should you carry into another colour study?
Before closing the page, mark one description that feels precise and one that remains uncertain. Use those notes to decide whether another session would benefit from clearer colour words, flatter samples or a steadier viewing position. The phrase “window-sill colour study” describes this particular set of observations, not a standard that another afternoon needs to match.
Remove the board if it blocks the window or makes the sill awkward to use. Your notes can stay on the desk as a record of how you described these colours under this afternoon’s light.