Why Wet Clay Holds a Fingerprint
Why wet clay holds a fingerprint comes down to plasticity and moisture. Learn how to press, read and preserve a clear mark as clay changes.
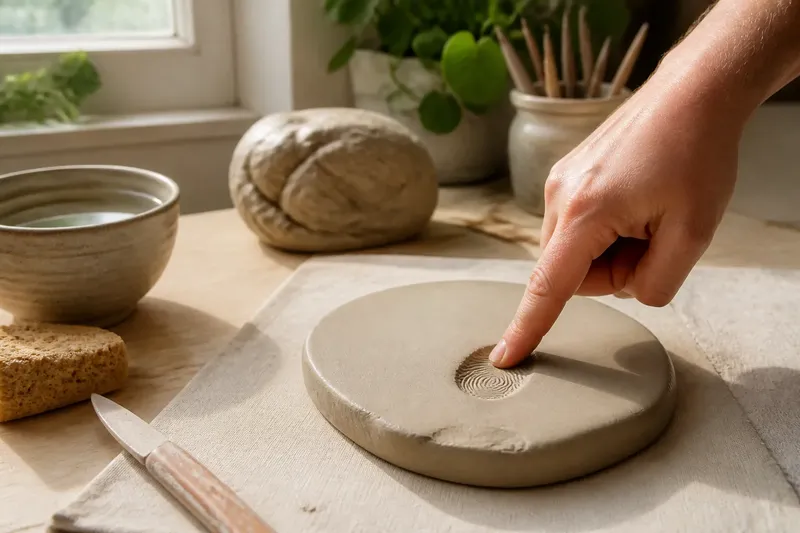
Press a thumb into a lump of clay and the hollow usually stays after you lift it. Why wet clay holds a fingerprint is a question about plasticity: the material can change shape under pressure, then retain that shape when the pressure stops. Its moisture helps the clay particles move past one another, but too much or too little water changes how clearly a mark forms.
Try the process with a small piece of pottery clay, a clean work surface and your own fingertip. The aim is not to make a perfect impression. It is to notice how the clay responds, then decide when its surface is ready to keep a mark.
What makes clay plastic?
Clay is made from very fine mineral particles mixed with water. In a workable state, those particles can shift and settle when you press them, while the clay remains joined together as a mass. That combination lets you deform it without having it crumble like dry earth or flow like a liquid.
A fingerprint is a record of pressure. The ridges on your skin push into the clay, displacing material into the spaces between them. When you remove your finger, the clay does not spring fully back, so the ridges and valleys remain visible.
Plasticity is not the same as softness. A very soft lump may slump or smear, while a firmer one can still take a sharp impression if it is moist and cohesive. The useful state is one where the surface yields to a gentle press but supports itself when you lift away.
How can you make a clear impression?
- Choose the clay. Use pottery clay sold as workable or plastic clay, rather than a dry, crumbly sample or a slip intended for pouring. Wedge or knead a small piece enough to make it even, but stop if it begins sticking heavily to your hands.
- Prepare a level surface. Set the clay on a clean board, canvas-covered bat or other stable work surface. A smooth, supported base helps the mark keep its shape instead of bending as you press.
- Flatten the area gently. Use a fingertip or a small wooden tool to make a patch broad enough for the print. Keep its surface even; a ridge, crumb or accidental dent can be mistaken for part of the fingerprint.
- Check the moisture by touch. The clay should feel cool and pliable, not wet enough to leave a film on your skin. If it is tacky, pause and let the surface firm slightly rather than adding dry powder that could roughen the impression.
- Press once, straight down. Place a clean, dry fingertip on the prepared patch and apply steady pressure. Avoid twisting or rocking, which can drag the ridges sideways and blur their pattern.
- Lift without pulling across the surface. Raise your finger vertically. Look at the mark in raking light, which makes shallow ridges easier to see, and note whether the grooves are distinct or have collapsed.
- Let the clay rest in place. Keep the piece supported while the surface firms. Moving it while it is soft can distort the print, especially if the impression sits near an edge.
Use only a modest press at first. A forceful push can compress the clay so much that the surface bulges around the print, obscuring its edges. If the mark is too shallow, smooth the patch and try again rather than repeatedly pushing into the same spot.
What does moisture change?
Water allows clay particles to move and helps the material stay cohesive. As moisture leaves, the particles become less mobile and the clay stiffens. A fresh lump may accept a deep, smooth print; as it firms, a lighter touch may leave finer detail with less risk of smearing.
When clay is too wet, it can cling to your finger, deform around the pressure and lose crisp edges. The surface may shine or feel slippery, and lifting your finger can pull a small peak from the print. Give it time to firm in open air, turning the piece only if doing so will not distort its shape.
When clay is too dry, it may resist the press, crack at the edges or break into crumbs. A dry surface is not made workable simply by pouring water onto it: that can create a slick outer layer while the clay beneath remains stiff. If the whole piece has dried unevenly, follow the clay maker’s directions for reconditioning it rather than trying to rescue the impression with a splash.
As a print dries, it may become easier to handle, but drying does not create the fingerprint. The mark is formed while the clay is plastic; drying preserves its shape by making the material firmer. Later firing transforms the clay further, so keep the impression away from handling and contact that could flatten it before it is ready.
How can you tell whether the clay is ready?
Use a small test press beside the area you want to keep. The right response is a visible dent with clean edges, little sticking and no cracking. If the clay springs back noticeably, it may be too firm for a deep impression; if the surface smears, it may need to firm before you continue.
Imagine you have a lump that leaves a wet sheen on your fingertip and gives a blurred test mark. Set it aside on its board until the sheen fades, then try the test press again on an unused patch. If the second mark has clearer ridges and your finger lifts cleanly, proceed; if the surface has begun cracking, stop and reassess the clay’s condition instead of pressing harder.
Clay can vary across a single piece. A thin edge dries faster than the centre, and a surface exposed to moving air may firm before a shaded area. Test close to the intended print rather than relying on how the clay feels elsewhere.
Which questions come up while making a print?
Should I wet my finger before pressing?
Start with a clean, dry finger. Added water can make the clay surface slick and may soften the edges of the impression; if your skin catches, adjust the clay’s condition rather than coating the print area.
Why did the ridges come out blurred?
Blurred ridges often come from movement during the press or lift, a surface that is too soft, or clay that sticks to the skin. Smooth the patch, let it firm if needed and make one steady press on a fresh area.
Can I take a fingerprint from firm clay?
Yes, if it still yields without cracking, but the impression may be shallower and require more deliberate pressure. Test on a spare patch first, because forcing a mark into stiff clay can split its surface.
Will the fingerprint stay after firing?
A well-supported impression can remain visible through firing, but handling, drying shrinkage and the clay body’s behaviour can affect its final appearance. For a piece that matters, check the clay supplier’s guidance and ask a ceramicist or kiln service about suitable handling and firing.
How should you preserve the mark?
Once you have a clear print, resist the urge to smooth nearby areas with a damp sponge. Water and repeated touching can soften the surface and wash away fine detail. If you need to trim or shape the piece, work away from the impression and support the clay so pressure does not travel through it.
For a keepsake or a reference impression, consider making a separate test print before shaping the final piece. Photograph the mark in side light while the clay is still at a stable stage, and keep the image alongside a note of the clay type and its feel. That record helps you compare results without having to press the original again.
Dry the piece gradually on a level, breathable surface, away from direct heat and draughts that could make one area shrink faster than another. The maker’s instructions and local studio rules determine appropriate drying and firing practices, so follow them for the clay and kiln you are using.
Why wet clay holds a fingerprint becomes clearest when you watch the material change under your own touch: moisture lets it yield, pressure gives the mark its form, and careful drying lets that form remain. Make the impression when the clay responds without smearing or cracking, and let the surface—not the clock—tell you when it is ready.